
Some links on this page are affiliate links. This means we may earn a commission at no additional cost to you if you click through and make a purchase, you can check our Affiliate Disclosure. Thank you for your support!
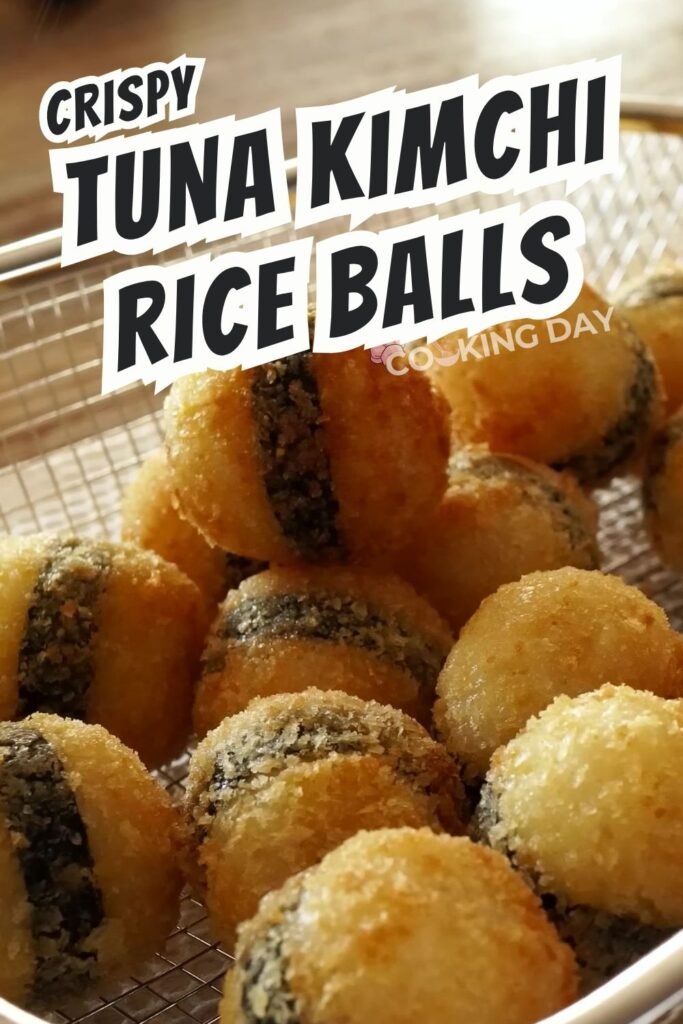
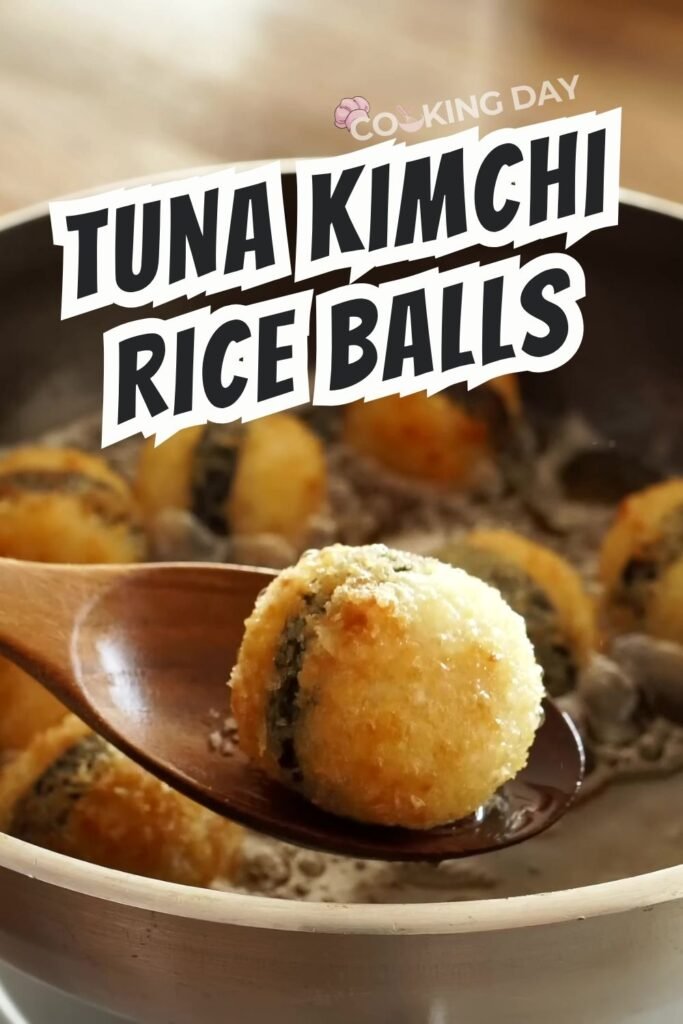
Crispy on the outside, gooey in the middle, and packed with bold flavor—these Tuna Kimchi Rice Balls are one of those snacks that disappear as soon as they hit the plate. You don’t need fancy tools or deep culinary skills—just some simple ingredients, your hands, and a love for cheese and crunch.
They’re perfect for anyone who loves kimchi, tuna, and that satisfying fried texture. Plus, they freeze well and reheat beautifully, making them a great make-ahead option!
Why You’ll Love This Tuna Kimchi Rice Balls Recipe
Crispy outside, melty center
Uses leftover rice—budget-friendly!
Easy to customize (bake instead of fry, add more spice)
Perfect for kids and adults alike
Great for parties, meal prep, or road snacks
Ingredients For Our Tuna Kimchi Rice Balls & What They Do
For Rice & Filling:
- 600g short-grain rice – Sticky rice holds the shape best.
- 135g canned tuna (drained to ~75g) – Mild flavor and protein-packed.
- 130g kimchi – Adds tang, spice, and a pop of color.
- 2 eggs – Used for coating and richness.
- 2 slices of cheese – Melty magic! Use mozzarella or your fave.
- Butter, sesame oil, sesame seeds – Boosts aroma and depth.
Seasoning:
- Salt – Just enough to balance flavors.
- Toasted sesame seeds – Optional but adds a lovely nutty crunch.
For Coating & Frying:
- Bread crumbs – Crunchy outer layer.
- Cooking oil – For deep frying (or air frying).
- Seaweed strips (optional) – Adds a savory edge and helps hold the ball.
Step-by-Step Instructions
1. Prep the Filling
- Drain tuna.
- Squeeze out extra liquid from chopped kimchi then cut.
- In a pan, melt butter and sauté the kimchi briefly.
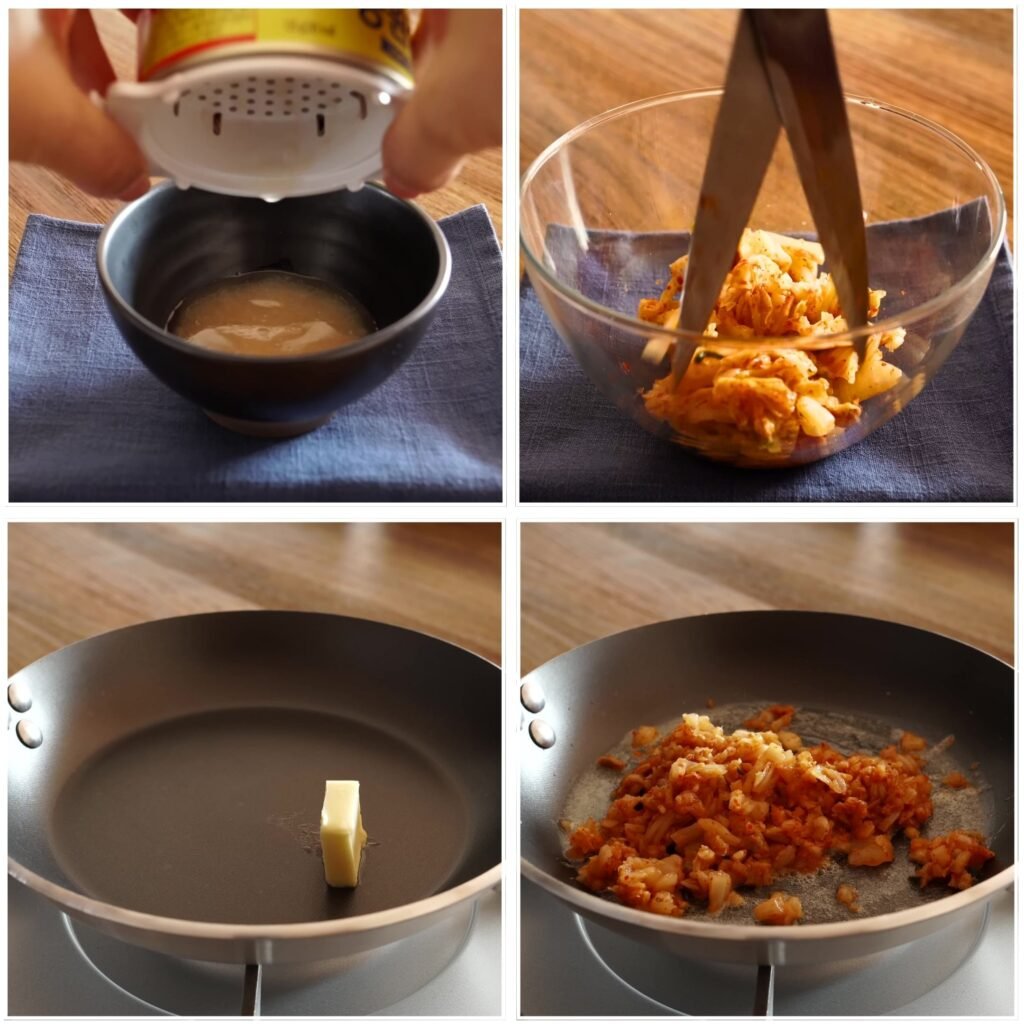
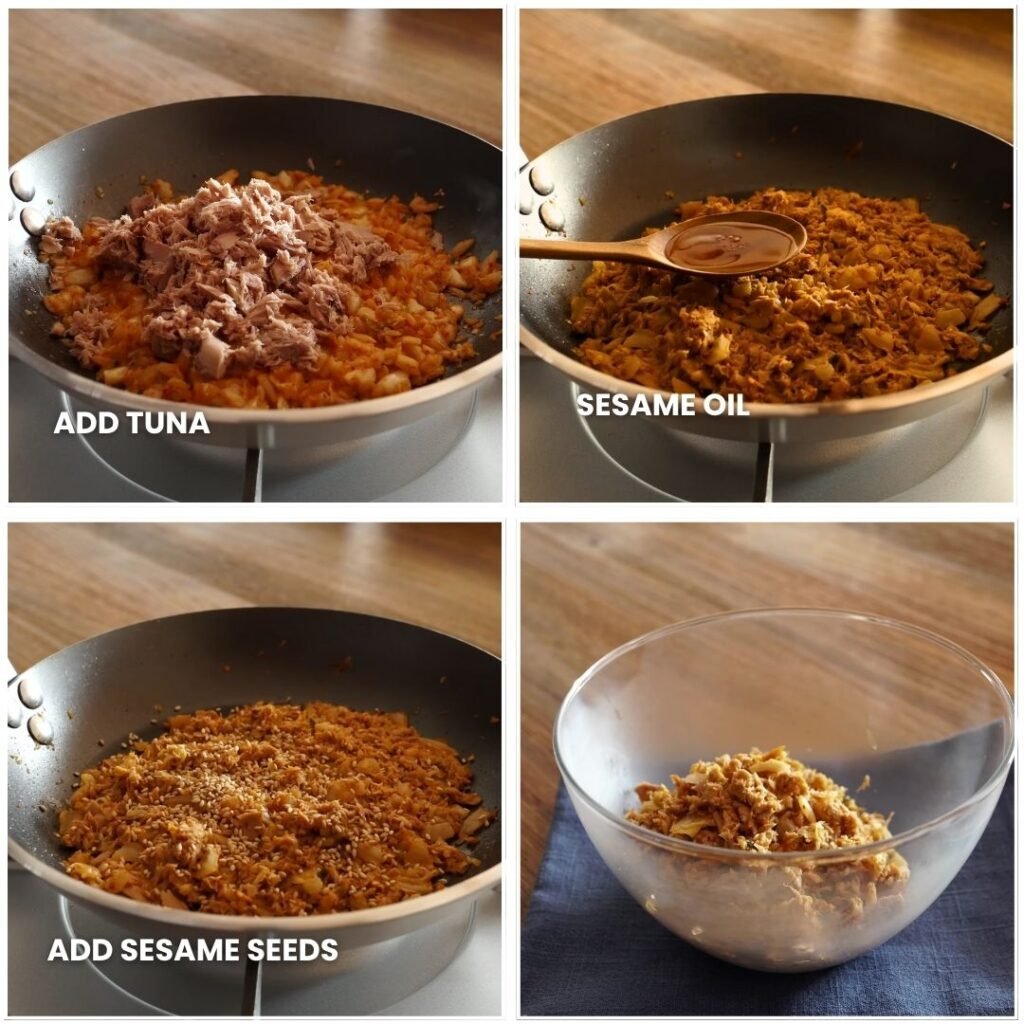
- Add tuna, 1 tbsp sesame oil, and sesame seeds. Cook for 1–2 minutes. Cool.
2. Season the Rice
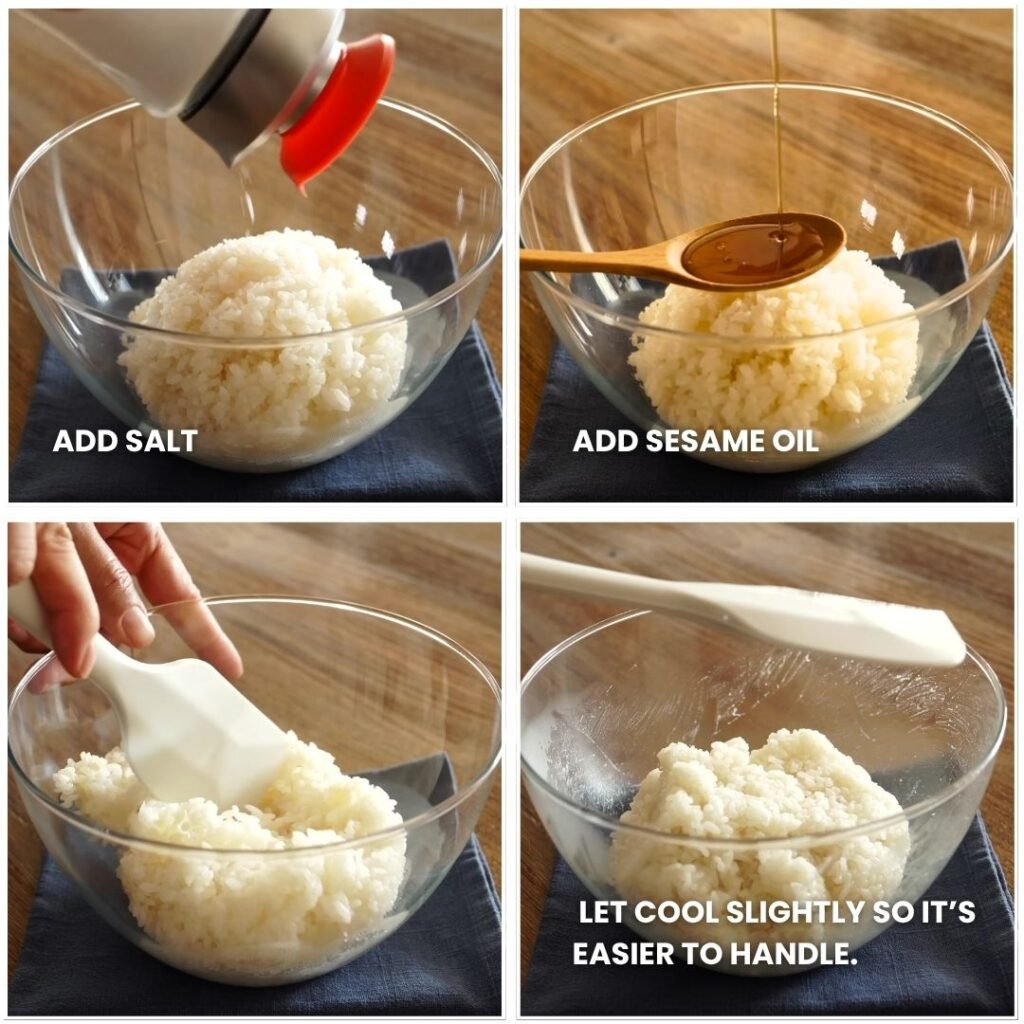
- In a large bowl, mix the steamed rice with ½ tsp salt and 1 tbsp sesame oil. Let cool slightly so it’s easier to handle.
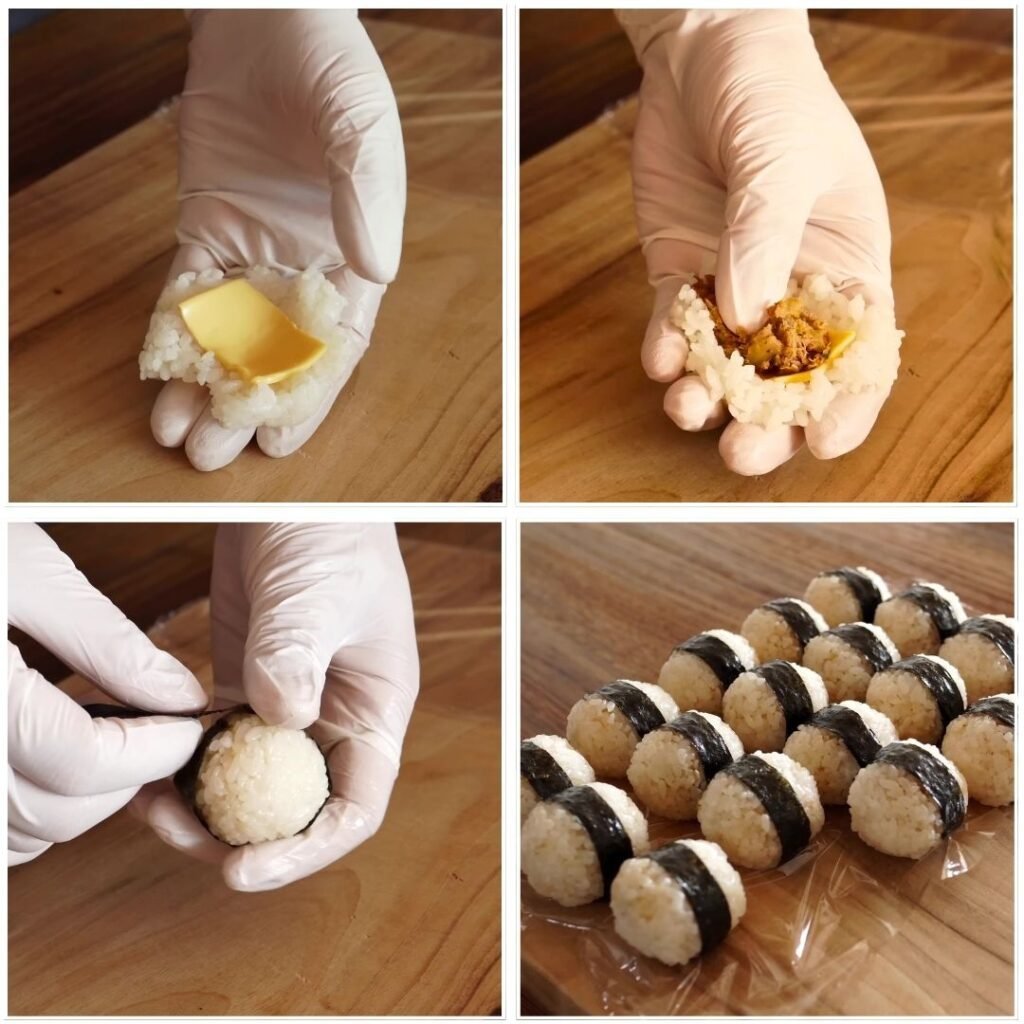
3. Shape the Rice Balls
- Use plastic wrap or greased hands.
- Scoop 1 tbsp of rice, flatten it.
- Add a small piece of cheese and 1 tsp of the filling.
- Top with more rice and shape into a firm ball.
- Optional: wrap a strip of seaweed around the outside for grip and flavor.
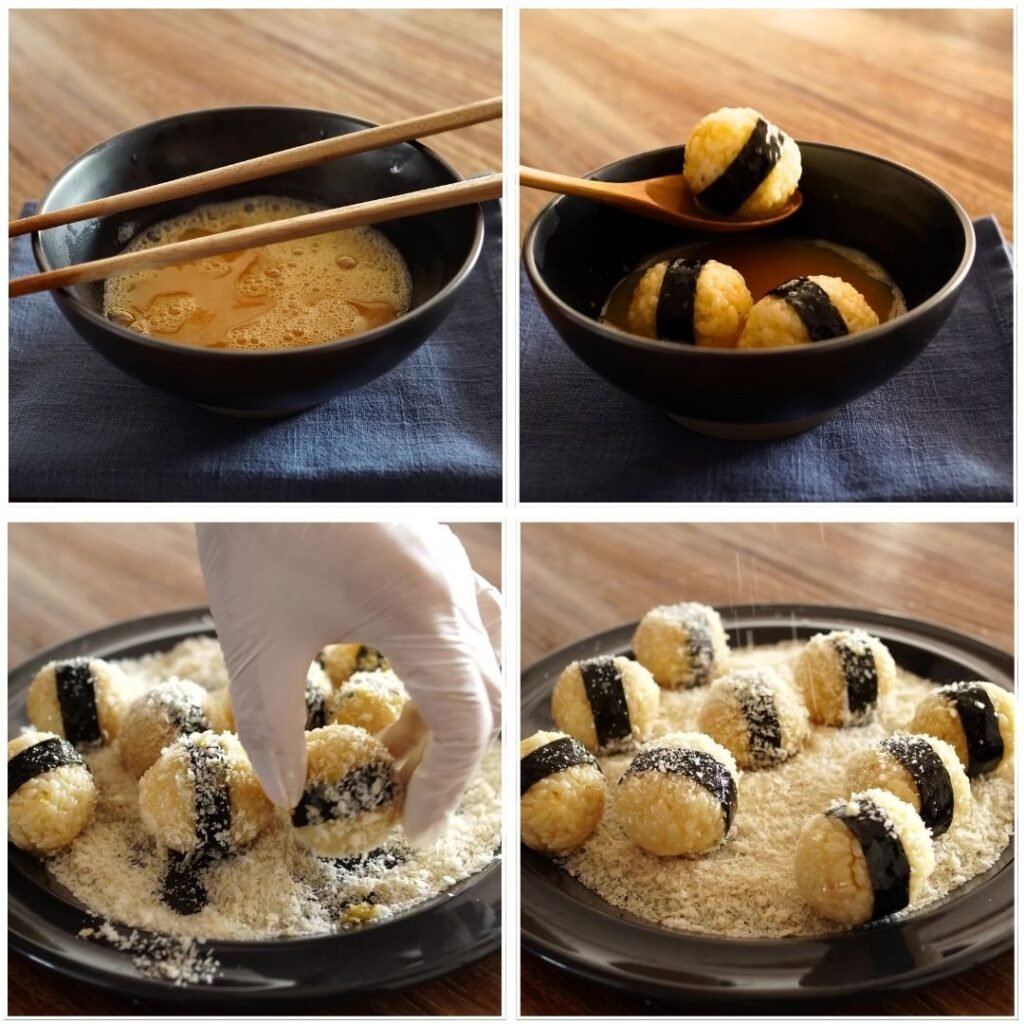
4. Bread the Balls
- Beat 2 eggs with ⅓ tsp salt.
- Dip each rice ball into the egg wash, then roll in breadcrumbs.
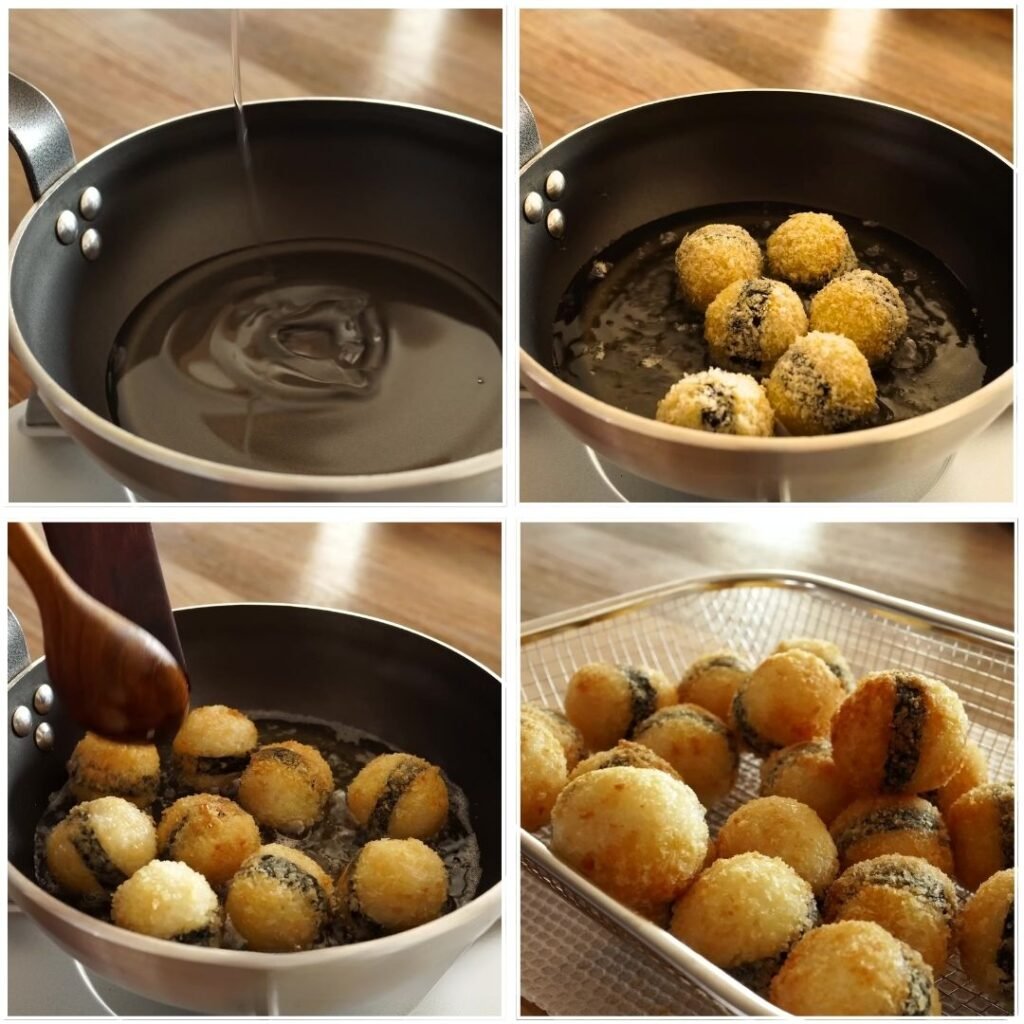
5. Fry Until Crispy
- Heat oil over medium heat.
- Fry in batches, turning gently, until golden brown and crisp (about 3–5 minutes).
- Remove and drain on paper towels.
Cooking Tips & Techniques
- Cool rice and filling slightly before shaping—this helps hold shape better.
- Use moist but not wet kimchi. Squeeze lightly after chopping.
- Cheese too runny? Chill the balls briefly before frying.
- Don’t overcrowd the pan. Fry 4–5 at a time for even crispiness.
Recommended Kitchen Tools
- Non-stick frying pan
- Deep fryer thermometer
- Mixing bowls
- Kitchen tongs
- Plastic wrap dispenser
How to Serve It
Dip it! Try gochujang mayo, sriracha mayo, or sweet chili sauce.
Pair it with miso soup or Korean seaweed soup. Or maybe try this recipe Spicy Korean Tofu Stew
Serve it warm for the best cheese pull.
Diet-Friendly Options
Bake instead of fry – 375°F (190°C) for 15–20 minutes, flipping once.
No cheese – Leave it out for a lighter version.
Add veggies – Finely chopped spinach or carrots blend in easily.
Best Ways to Store
Fridge: Store cooled rice balls in an airtight container for up to 2 days. Reheat in oven or air fryer.
Freezer: Freeze shaped (uncooked) rice balls for up to 1 month. Fry straight from frozen.
Recipe Variations
Swap tuna for cooked minced chicken or spam.
Use different cheese – Try cream cheese or cheddar.
Add heat with gochujang or red pepper flakes.
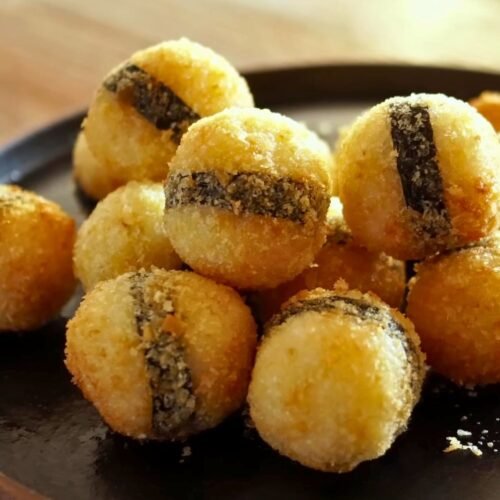
Crispy Tuna Kimchi Rice Balls – Golden, Cheesy & Delicious!
Equipment
- Non-stick skillet
- Mixing bowls
- Plastic wrap
- Deep frying pan or wok
- Cooking tongs
- Paper towels
Ingredients
Rice & Filling:
- 600g steamed short-grain rice (fresh or leftover)
- 135g canned tuna (drained to ~75g)
- 130g kimchi (lightly squeezed and chopped)
- 2 eggs
- 2 slices cheese (mozzarella or your favorite melting cheese)
Seasoning:
- 1/2 tsp salt (for rice)
- 1/3 tsp salt (for eggs)
- 8g butter (for sautéing)
- 1 tbsp sesame oil (for rice)
- 1 tbsp sesame oil (for tuna kimchi)
- 1 tbsp toasted sesame seeds (optional)
Coating & Frying:
- Bread crumbs (for coating)
- Cooking oil (for deep frying)
- Seaweed strips (for wrapping, optional)
Instructions
- Prep the Filling:Drain tuna and set aside.Finely chop kimchi and lightly squeeze out excess moisture.In a pan over low heat, melt butter. Add kimchi and sauté briefly.Stir in tuna, 1 tbsp sesame oil, and sesame seeds. Cook for 1–2 minutes. Set aside to cool.
- Season the Rice:In a bowl, mix steamed rice with 1/2 tsp salt and 1 tbsp sesame oil to prevent sticking.
- Make Rice Balls:Place plastic wrap on your work surface.Scoop 1 tbsp of rice and flatten it.Add a small piece of cheese and 1 tsp of tuna-kimchi filling in the center.Wrap with more rice and shape into a firm ball.Wrap with a strip of seaweed (optional). Repeat until all are shaped.
- Coat and Fry:Beat the eggs with 1/3 tsp salt.Dip each rice ball in the egg wash, then roll in breadcrumbs to coat.Heat oil over medium heat. Fry rice balls until golden brown, turning occasionally.Drain on paper towels.
- Serve:Enjoy hot and crispy with dipping sauce or as is!
Notes
Pro Tips & Variations:
- Cheese Substitute: Use cream cheese or go cheese-free for a lighter version.
- Baked Option: Bake at 375°F (190°C) for 15–20 minutes for a healthier alternative.
- Spice Level: Adjust kimchi spiciness to taste; add gochujang for extra heat.
- Storage: Store cooked rice balls in the fridge for up to 2 days. Reheat in an oven or air fryer for crispiness.
Common Questions Answered
1. Can I use leftover rice?
Yes! Just warm it slightly before mixing to make shaping easier.
2. Can I use canned salmon or chicken instead of tuna?
Absolutely—any cooked meat works!
3. What’s the best cheese for stuffing?
Mozzarella is ideal for melting, but cheddar or string cheese work great too.
4. Can I make these ahead?
Yes. Shape and store in the fridge or freezer. Fry just before serving.
5. How do I keep them from falling apart while frying?
Firm shaping and cold rice help. If needed, chill the shaped balls for 10 minutes before frying.
These Crispy Tuna Kimchi Rice Balls are the ultimate flavor bomb—spicy, cheesy, crunchy, and satisfying all in one bite. They’re fun to make, easy to eat, and totally addictive. Whether you serve them at a party or pack them for lunch, you’ll love every bite.
Try them once—and they’ll become your go-to snack! 🎉🍙🔥